Showing posts with label sewing. Show all posts

Monday, February 21, 2011

A Fun Ruffled Scarf from an Old T-Shirt


So as I mentioned in the previous post I have been absolutely dying to buy one of Lindsey's scarves over at the Pleated Poppy. But, now that we are adding up the initial costs of full day preschool for James and daycare for Ella, my start-up clothes allowance for my new job is shrinking. So, I looked at her scarf, searched around Blogland a bit, begged a t-shirt off of my husband and tah-dah!! I made this scarf in about five minutes.

SERIOUSLY. No joke.

Make it!

I found a great tutorial here.

XOXO


a

Wednesday, January 19, 2011

Bean Bag Tutorial

I recently made bean bags for the first time for a little niece of mine that was turning one.

I thought they would be a fun gift for her, and pretty simple to whip up. I already had some sweet cupcake material on hand, and some white flannel with pink polka-dots from Ella's Baby Quilt.

First, I gathered all of my materials. (Enough material for four bean bags.)


  • 4 squares of 6" x 6" fabric for the tops of the bags
  • 4 squares of 6" x 6" fabric for the bottom
  • 8 squares of 5" x 5" fabric (anything you have lying around and nothing fancy because it is for the inner bean bag pouch)
  • beans (I found Navy beans on sale in my grocery store for $.78 a bag, I used two bags and a half a bag for each bean bag)

First sew the four inner pouches. I don't sew these right-sides-together and flip, there isn't any point as they won't be seen. I sewed the inner bags just so that there wouldn't be a choking hazard if for some reason the baby was able to break open an outer bag. SAFETY FIRST!

I sew all the way around the bag, leave a 2" hold for filling the bag with the beans; fill and sew closed.

Next I sew the outer pouches by sewing right sides together, 1/4" all the way around leaving a good sized gap to turn inside out and also to be able to stuff the inner bag inside the outer bag.

Turn them inside out and press seams flat.

Stuff the inner pouches inside the outer trying to line up corners.

Sew a seam 1/4" from the edge all the way around the bag, sewing shut the opening as you go. I sewed over the opening twice.

Repeat for the last three and you're done!


So cute!


And homemade, with love, and original!


Now go make some for that little cutie patootie in your family!

This post is a part of the following link parties:


Show and Tell Green
a
yy351/jdsmit21/SMAbuttonWDIWargylecopy-1.jpg" />

Friday, January 14, 2011

Christmas Stockings from Vintage Quilt Remnant

Some how in the hustle and bustle of Christmas I forgot to blog about some stockings that I made for my Dad and my sister Amy. They were coming to spend Christmas day here in Connecticut. I wanted them to have some stockings hanging on the mantle, and so I got to work thinking about how to make them.

Ten years ago I ordered velvet stockings from Pottery Barn for Chris and I. As our children joined our family, I added a stocking for each of them. I decided to take a look at one of them and try and copy the design.


I actually went and bought fabric for them initially--I purchased fabric that had a vintage feel to it, and I was going to go with a quilted look. When I got home and laid the fabric out to begin the project, it hit me that I had a nice vintage red and white quilt remnant from my Dad in my stash.


Wouldn't it make a perfect stocking, I thought!

The process took me a few hours--I haven't ever really sewn anything quite as involved as a stocking, and it takes some figuring out about how to add the lining and the cuff, and how to put all of the pieces together and sew them correctly so that when the whole project is turned it is right.


Sure there is some damage, but it just adds to the lovely vintage look, don't you think? The cuff is just the reverse side of the quilt; I thought that the sewing was so beautiful against the aged white that it would look really sweet as the cuff.

I could kick myself that I didn't take photos of both of the stockings, the details of the lining and the backs. The back I made from a piece of green flannel that was my Mom's. I thought it was important to incorporate a little bit of her into these stockings. Comforting.

Anyhow, I wanted to post about these before it was too late. Now I want to make four more for Chris, James, Ella and I for next year!

I am linking up at the following parties:

The Shabby Nest
Chic on a Shoestring
My Romantic Home
A Few of My Favorite Things

Happy Weekend!

A

Monday, December 20, 2010

Christmas Quilted Potholders and Mug Rugs

I am super excited to share these Christmas Quilted Potholders and Mug Rugs that I made last week!


I have been crafting for Christmas like CRAZY and I even lie in bed at night, thinking about my next project. Something has really clicked for me with sewing in the last few months and I am really enjoying my moments at the machine.

Anyhow, remember these Scrappy Quilted Potholders that I posted about last week?


I followed a tutorial that I found over at Texas Freckles. But, the whole potholder sewing frenzy started when I was looking at the potholders that my friend Stephanie over at Built to Last had made for me. Here they are:


I couldn't really find a tutorial that I liked, so I just looked at hers and whipped up my own version!


I used the crazy zig-zag on the back that I learned from the crazy potholders tutorial.


They were so much fun that I made another pair a few days later!


They are made with two layers of Insul-brite on the inside.


After that I had some small pieces of Insul-brite left over, so I made two Scrappy Quilted Mug Rugs!


How cute is this?


I think the little Santa peeking out from the middle with his gifts is SO SWEET!


If you have been keeping up with me this month, you have seen a lot of this Christmas fabric that I have been using for my projects. I only bought a yard of each, and I have made:

1 Shabby Ruffle Holiday Wreath
2 Crazy Scrappy Quilted Christmas Potholders
4 Traditional Quilted Christmas Potholders
1 Christmas Headband
14 Christmas Rosette Pins
2 Quilted Mug Rugs
5 Mini Rosette Christmas Stockings (will share later in the week)

I'd say that was a pretty good use of all of that fabric!


What have you been working on? Don't forget to share with me tomorrow for Tell Me Tuesday!

This post is a part of the following link parties:

The Girl Creative

Making

mmm button


Market Yourself Monday at Sumo's Sweet Stuff

Talent Tuesday at Vintage Wanna Bee

Friday, December 10, 2010

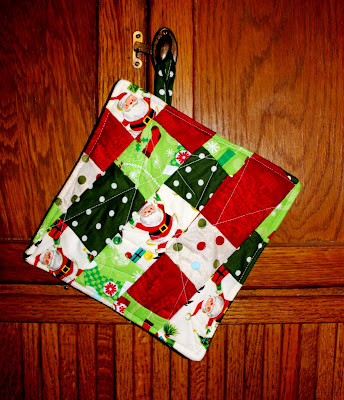
Scrappy Quilted Christmas Potholders


I think I might really have caught the crafting and sewing bug. I am actually lying awake in bed at night, thinking about the long list of projects that I want to complete. (Well, that and that Katy Perry song that I can't get out of my head.)

Anyhow, my friend Stephanie from Built to Last sent me some adorable quilted potholders last year. I proudly hang them on my Hoosier cabinet so that I can look at them every day.


Since I look at her gorgeous potholders everyday, I have been thinking about making some of them. I was happy to notice that Stephanie's do not have binding. I made my own binding for the first quilt I ever made and it was a long haul, and one I am not ready to repeat.

I looked around on the Web for a tutorial that would make a potholder similar to hers, and I just couldn't find one. But I did find this one, made by Melanie at Texas Freckles, and I felt like I could do it!

Tah-dah!!!


Melanie's tutorial involves piecing scraps one piece at a time and sewing them across the Insulbrite, then laying the next scrap right sides together on top of the first scrap, and so on, and so on. In this potholder below I started with the Santa scrap in the center and then kept moving along.


I used a piece of the green and white polka-dot on the back. And look, binding!!!


Aren't they cute???


Oh, and yes, I know they don't look like Stephanie's. I actually ended up making two more yesterday afternoon, and based on hers. Wouldn't you know, I simply looked at hers and USED MY BRAIN to figure out how to copy them. I'll show them to you next week!

Happy creating!

This post is a part of the following link parties:

Get Your Craft on at Today's Creative Blog

Tip Me Tuesday at Tip Junkie

Take A Look Tuesday at the Sugar Bee


Wednesday, December 8, 2010

Upcycled Toddler T-Shirt Dress

I was introduced to a FABULOUS toddler t-shirt dress a few weeks ago, and I couldn't get the tutorial out of my head. Cheri put it together from I Am Momma Hear Me Roar. You can find the tutorial here.

This is my version:

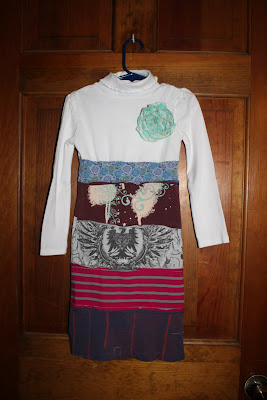
Cheri actually handpainted some of the t-shirt material that she used. I knew I had some fun old shirts that I hadn't worn in a while, so I grabbed them and got started. I made two dresses in under two hours, using a turtleneck as the top for one and a long-sleeve t-shirt top for the other. The strips all came from the same shirts.

When I finished the dress for my daughter (the other is for a friend's daughter) I asked her to model it for me. From the start the shoot was not going well. My model was being camera shy:


Here you can at least see how the dress falls:


My model was getting delirious at this point. I think its funny that it looks like her tights match her sheet.


Awww . . . this is better!


Here is the finished dress. In Cheri's tutorial she sews the strips wrong sides together to have the horizontal seams show. I did this on the first dress, but sort of forgot on Ella's.


I showed the dress to my husband and he said he recognized the strips in the dress right away! Notice that the last strip is actually from the bottom of a shirt so that you don't have to hem the dress!


Here is the one I made for my little friend Mary Larkin, complete with the now-famous ruffle pin that her mother made:


Here is a close-up of the shirt fabrics, which came from:

Target
Old Navy
Marshalls
Old Navy


And isn't the twirly turtleneck so sweet with the ruffle pin?


Thanks for the great tutorial Cheri! I will definitely be making more of these in the future. To see my other two upcycled dresses, visit these links:

Ruffle Dress / Tunic Tutorial

Upcycled T-shirt to Toddler Dress Tutorial

This post can be found at the following link parties:


Show and Tell Green