Friday, December 31, 2010

Happy New Year, My Friends!

To all of you who have been reading Vintage Pollyanna since I began this journey in July of this year, thank you!
Although I have had a personal blog for more than three years, Vintage Pollyanna has been a spot completely dedicated to exploring all of the vintage creativeness and crafty goodness swirling around in my head.

I believe that 2011 will be an important year for this blog and for me. I am taking steps to really explore turning this blog into my business. I can tell from all of the thoughtful feedback that you readers have left me that there is a real niche for a place that mixes vintage whimsy with fresh crafting ideas.

That said, I am working on bringing my 15 years of communications and marketing experience to bear on making Vintage Pollyanna profitable. Soon you will see a re-design of the blog, sponsored give-a-ways, blog hops, a regular weekly link to my Dad's antique auctions, and the availability of sponsor advertising space. There will also be the addition of an Etsy store--though that may not happen until the 2nd quarter of 2011, and a possible Face Book page.

I hope you will continue to take this journey with me--I believe that 2011 will be a thrilling year, and I hope that you join me for the ride!

All the best for a loving, prosperous and fun-filled 2011,


Tuesday, December 28, 2010

Tell Me Tuesday #7

Hi everyone and welcome back to Blogland after what I am sure was a long weekend filled with family, friends and Christmas magic! We had a wonderful weekend, which you can read more about over at my family blog, Under A Shady Tree. I will be highlighting several antique and vintage gifts this week that my Dad brought down from Maine. Be sure to check back--they are whimsical and wonderful!

Here is a sneak peek:


Last week we had 26 entries in the link party--I was assuming we would have a low turnout, especially if everyone was busy with last minute Christmas preparations like I was! But for those of you who stuck with it and participated, THANK YOU!

Here are my faves from last week. Let's start with this fabulous Wine Bottle Christmas Display from Cleverly Inspired. A few wine bottles, some Epsom salt and a burst of creativity and WOW!


I had to include these sweet cookies--they are Palmiers from My Life as Prose. These look light, and sweet, and relatively simple, although it does seem like you really have to watch them while they are baking, and sometimes I'm not good at that with two little ones running around!


And here is my absolute favorite from last week--this is a Peace Wreath from Groovy Wine Lips. Like many of us, she found a fabulous wreath at Pier One, but the hefty price tag made her think about making one of her own. LOVE IT!


Thanks so much for supporting my link party--there are several of you who have been with me since the beginning, and I appreciate that!

If I featured you as a fave, please grab my button for your blog and CONGRATS!


Now on to the party!

Be sure to grab a button and include it in your post, and leave me a comment to let me know how your Christmas was!


<div align="center"><a href="http://vintagepollyanna.blogspot.com/" title="http://vintagepollyanna.blogspot.com/"><img src="http://fototime.com/DC00757D3FF4563/standard.jpg" alt="http://vintagepollyanna.blogspot.com/" style="border:none;" /></a></div>

Friday, December 24, 2010

A Last Minute Bow-Making Tutorial

Last week my friend Yolanda posted a photo of a stunning present she had wrapped for Christmas on Face Book, and I just HAD to ask her to share a bow-making tutorial with us! (I will be wrapping into the wee hours of the morning, and I know I'm not the only one, so hopefully we can all put this tutorial to good use before Santa arrives!)


I went to high school with Yolanda, and now, years later, we have reconnected through Face Book. Yolanda lives in Dallas and is married with two beautiful children. Though not a blogger, Yolanda has been a supporter of my blog, and I am pleased to give her tutorial a home on Vintage Pollyanna.


Yolanda's Bow-Making Tutorial

Cut off 5 to six feet of ribbon, preferably a ribbon that has stiff edges/piping because it shapes better. Use 3 to 4 feet for smaller packages or bows.


Take one of the ends of ribbon and fold in about 6 to 7 inches.


Continuing folding ribbon end over end until you have no ribbon left.


Fold the folded portion in half.


You'll have a nice ribbon sandwich!


Snip the corners of the sandwich on the fold. Make sure to snip a big enough piece as this is what helps to shape and twist the ribbon into the bow.


Unfold the sandwich one time and it will look like this:


Cut off another piece of ribbon to tie around the folded ribbon at the notches. Cut as much for the tails as you would like hanging down from the bow. Tie this piece around the center of the unfolded sandwich where you snipped.


It's cute now, but just wait!


Start sliding out the folded pieces that are layered within one another. As you do you can twist them and shaped them to be puffy and pull them into the position you want.


The piping or wire helps to hold the shape you create.


Your bow is finished!


Now go wrap some presents!


Thanks Yolanda! This was fun--let's do it again sometime! And to all of you,

MERRY CHRISTMAS!

xoxo

Allison

PS. this post is also seen in the Today's Creative Blog Get Your Craft On link party.

Thursday, December 23, 2010

Stocking Garland & A Vintage Card

My dear friends over at Three Sisterz made some beautiful little Rosette Stockings for Christmas. I loved them, and they had some of the red felt stockings left over and sent them to me. Here's my little Stocking Garland!


I made the rosettes the way I made my Christmas Rosette Pins. Cute!


I didn't use Fray Check on them, can you tell?


I also wanted to share this vintage Christmas card with you. My parents always sent me vintage cards for special occasions. This one was for James' second Christmas, I think.


It says "Toot! Toot! Chug! Chug! All Aboard for a Merry Christmas and a Happy New Year!"


I have just finished a super top secret project that I can't share here until after Christmas. But I can tell you that it involves a damaged antique quilt that had found a new life! This was my last project before Christmas--so all of my sewing is done!

And I have a special news bulletin--on Christmas Eve day I am having my first guest post--be sure to check back and see this great post which will be useful for all of you last-minute package wrappers!

Tuesday, December 21, 2010

Tell Me Tuesday #6

Hi! How is everyone, and how is the Christmas crafting going? Have you seen all of the things I have been churning out lately? I am a maniac--and that is surprising considering that I've had some cruddy cold, sinus, fever thing stalking me for the last two weeks!

I do need to start by saying that I do miss your comments, my dear readers. I am so happy that you are linking, but please leave me a comment to give me some feedback and let me know you are out there. And don't forget to visit other folks and say hi! I know we can all use a little feedback to let us know if you like what we have been working on, if one of our projects inspired one of yours, etc.

So last week we had some really amazing, fabulous, terrific, SO STINKIN' CREATIVE entries!! I love this link party thing, I mean, how could I not--I host a little party, all of these sweet guests arrive, we hang out and "chat" about our projects, and everybody leaves with an inspired mind. Love it.

Anyhow, here are my faves from last week. Let's start with this Sweet Fabric Gift Bow from See Kate Sew. First of all, have you visited her blog before? I can't get over how much I like it--her fresh and quirky style is really fun. I actually had also earmarked her pink ornament necklace as a runner up, and then had to laugh out loud when I saw that two her projects were in my top 10 from the whole list!


Fave #2 is this Peppermint Lip Balm from Eye Spy D.I.Y. One of the reasons I really like this entry is because I NEED SOME LIP BALM RIGHT NOW and because it actually looks doable. Plus the packaging is cute. Nice work, Katie!


And here is Fave #1, and I picked this just for the sheer whimsy of it--these Snowman Treats from Flexible Dreams just make me giggle. That's all. And if you aren't at least cracking a teensy weensy smile when you read her post about these little guys, then you are a GRINCH!


If I featured you as a fave, please grab my button for your blog and CONGRATS!


Now on to the party! I really hope we make it to fifty this week--as I promised before, I will have a giveaway to celebrate hitting 50 entries in the Tell Me Tuesday Party! We had 38 entries last week, the most ever--I know you can do it! And lastly, if I don;t have a chance to say hello before your holiday count down gets to crazy, let me say thanks for reading, thank you for your support of this party and my blog, and MERRY CHRISTMAS!


Monday, December 20, 2010

Christmas Quilted Potholders and Mug Rugs

I am super excited to share these Christmas Quilted Potholders and Mug Rugs that I made last week!


I have been crafting for Christmas like CRAZY and I even lie in bed at night, thinking about my next project. Something has really clicked for me with sewing in the last few months and I am really enjoying my moments at the machine.

Anyhow, remember these Scrappy Quilted Potholders that I posted about last week?


I followed a tutorial that I found over at Texas Freckles. But, the whole potholder sewing frenzy started when I was looking at the potholders that my friend Stephanie over at Built to Last had made for me. Here they are:


I couldn't really find a tutorial that I liked, so I just looked at hers and whipped up my own version!


I used the crazy zig-zag on the back that I learned from the crazy potholders tutorial.


They were so much fun that I made another pair a few days later!


They are made with two layers of Insul-brite on the inside.


After that I had some small pieces of Insul-brite left over, so I made two Scrappy Quilted Mug Rugs!


How cute is this?


I think the little Santa peeking out from the middle with his gifts is SO SWEET!


If you have been keeping up with me this month, you have seen a lot of this Christmas fabric that I have been using for my projects. I only bought a yard of each, and I have made:

1 Shabby Ruffle Holiday Wreath
2 Crazy Scrappy Quilted Christmas Potholders
4 Traditional Quilted Christmas Potholders
1 Christmas Headband
14 Christmas Rosette Pins
2 Quilted Mug Rugs
5 Mini Rosette Christmas Stockings (will share later in the week)

I'd say that was a pretty good use of all of that fabric!


What have you been working on? Don't forget to share with me tomorrow for Tell Me Tuesday!

This post is a part of the following link parties:

The Girl Creative

Making

mmm button


Market Yourself Monday at Sumo's Sweet Stuff

Talent Tuesday at Vintage Wanna Bee

Thursday, December 16, 2010

Holiday Fabric Rosette Pins Tutorial

I have just finished making twelve of these fabulous little Holiday Fabric Ruffle Pins as a gift for the teacher's at my son's pre-school. Here's the tutorial for you!


I wanted to give them something handmade, quirky, and fun. One day last week I was looking at my all-time favorite accessory, this fabulous Ruffle Pin from Flannery over at Three Sisterz.

You might remember my post about the night that she and I made rosettes from fabric and zippers. You can also find the tutorial for the actual ruffle making process there. I'm not sure how hers turned out so much curlier than mine--but mine are pretty cute, right?

Sp basically, I cut about an 18" by 2" strip of fabric. I then set my tension to the highest number and my stitch length to 4. Then I folded the strip in half and sewed down the strip vertically, about 1/4" away from the folded side. This creates a long ruffle. Next, I cut out a square piece of felt, placed one end of the strip in the middle, and then start sewing the ruffle down, turning the square as I go. You really have to feel the process out. This is what it looks like from the back (after I trim down the felt.)


Next, I cut a circle of felt to cover the back, which is a little messy. I will also give me a clean surface to which I can hot glue my pin.


A little glue,


Press it to the back of the rosette, and let it dry.


Here is a view of my assembly line:


Next, I apply a few dots of fray check around the rosette. I actually like a few threads coming off of it, I think it makes it look a little shabby.


Here are the pins that I use, I got them from Michael's.


They come with a sticky strip and foam backing. I peel off both (please ignore my markered up finger tips!)


I turn all of the rosettes over, and put strips of hot glue on the backs of two of them at a time.


Next I position the pin, and press lightly.
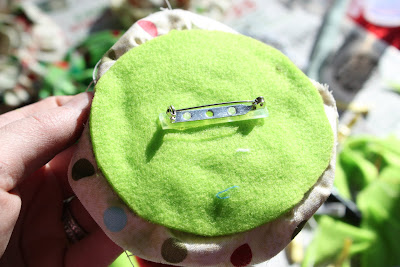

Here they all are, ready to go!


This morning I asked James to make a card for his teachers to go with the pins.
It says "I love PSA" which is Pre-School of the Arts. I drew the outline of the tree, but he did all the rest!


He wrote the message inside, all by himself!


All done and ready to go!


Merry Christmas to the teachers at PSA--thanks for all that you do!

This post is a part of the following parties:

HollyBloggyButton1


Look at Me, I'm So Crafty at It's Fun to Craft
Favorite Things Friday
Show and Tell Friday at My Romantic Home
Frugal Friday at the Shabby Nest
Talent Tuesday at Vintage Wanna Bee